Whether you’re a beginner or an experienced artist, this easy guide will teach you how to draw a dog. You can follow these steps whether you’re drawing on paper or using a computer or tablet. The tutorial breaks down the process into simple steps, starting with basic forms and gradually adding details to create a realistic dog drawing.
How to Draw a Dog?
The Basic Forms
Before you start drawing a dog, it’s helpful to understand the basic forms. In this tutorial, the dog’s body and face are simplified into three circles. The bottom two circles form the body, while the top circle forms the face. Additional circles are added for the muzzle and ears. The legs and tail are also added using correct proportions and positioning. This step helps to establish the overall shape and structure of the dog.
Understanding the basic forms is essential for creating an accurate and proportionate dog sketch. By breaking down the complex anatomy into simple shapes, you will have a solid foundation to build upon. These basic circles serve as a guide for adding more details and refining your drawing.
Here’s a visual representation of the basic forms:
The Basic Forms of a Dog
| Circles | Function |
|---|---|
| Bottom two circles | Form the body |
| Top circle | Forms the face |
| Additional circles | Muzzle and ears |
| Legs and tail | Added using correct proportions and positioning |
By keeping these basic forms in mind, you can ensure that your dog drawing looks proportionate and visually appealing. Practice sketching dogs using these forms, and gradually add more details to bring your drawings to life. The next section will delve into outlining the dog’s body and features, taking your drawing to the next level.

Outlines and Features
Once the basic forms are established, it’s time to outline the dog’s body and features. This step is crucial as it adds definition and realism to the drawing. To create the outlines, use a darker pen or pencil and employ different techniques based on the specific areas of the dog’s body and fur.
- Top of the Body: Use normal lines to outline the back, neck, and head. These lines should follow the contours of the circles that form the basic structure of the dog.
- Bottom and Fur Texture: Use hatching lines to outline the chest, belly, and lower parts of the body. These lines should be drawn close together to create the illusion of fur texture, making the drawing look more realistic.
- Joined Shapes: Connect the outlines of the chest, belly, forehead, muzzle, and nose to form continuous shapes. This helps in sculpting the look of the dog’s face and body.
- Legs: Add thickness to the legs by drawing outlines on either side of the scaffold lines. These outlines give the legs a three-dimensional appearance.
By focusing on these outlines and features, you can bring your dog drawing to life and capture the unique qualities of your subject. Remember to pay attention to details and observe the proportions of the individual features. The final outlines will provide the necessary definition to make your dog portrait stand out.

Additional Tips:
- Observe and study real dogs to understand the structure and movement of their bodies. This will help you create more accurate outlines.
- Experiment with different line weights and shading techniques to add depth and dimension to your drawing.
- Practice drawing the outlines multiple times to improve your accuracy and confidence.
Different Poses
Once you’ve mastered drawing a dog in a basic pose, you can apply the same steps to draw dogs in different poses. By adjusting the positioning of the circles and lines, you can create dogs jumping, running, or sitting. The tutorial provides guidance on positioning the circles correctly and drawing legs, eyes, and muzzle in different poses. This section is especially helpful for beginners and kids who want to learn how to draw dogs in a fun and creative way.
Let’s take a look at some of the different poses you can draw:
- Jumping Pose
- Running Pose
- Sitting Pose
For each pose, you’ll start by drawing the basic forms of the dog as outlined in the previous section. Once you have the basic forms in place, you can adjust the positioning and angles to create the desired pose.
Jumping Pose
In the jumping pose, the dog’s body is elongated and its legs are extended as if it’s leaping off the ground. To draw a dog in this pose, you’ll need to draw a longer body and extend the legs in a dynamic and energetic way. Pay attention to the positioning of the circles for the body and face, and make sure to draw the extended hind legs and the front legs reaching forward.
Running Pose
In the running pose, the dog’s body is in motion, with one or more legs off the ground. To draw a dog in this pose, you’ll need to create a sense of movement by elongating the body and extending the legs in different positions. It’s important to capture the stride of the dog’s legs and the forward lean of its body.
Sitting Pose
In the sitting pose, the dog is resting on its haunches with its front legs straight and its hind legs folded underneath. To draw a dog in this pose, you’ll need to focus on the positioning of the circles and the proportions of the body. Pay attention to the angle of the head and the position of the ears and tail.
Different Poses Examples:
Here are some examples of dogs in different poses:
| Jumping Pose | Running Pose | Sitting Pose |
|---|---|---|
 |
 |
 |
Elaboration
In this stage of the tutorial, you will learn how to add more details to your dog drawing, bringing it to life and making it more realistic and recognizable. By focusing on key elements such as the eyes, nose, muzzle, paws, and fur, you will capture the unique characteristics of different dog breeds.
Step-by-Step Guide to Add Details
To create a more realistic dog drawing, follow these step-by-step instructions:
- Start by sketching the eyes using oval shapes. Pay attention to the size, position, and shape of the eyes, as they play a crucial role in portraying the dog’s expression.
- Next, draw the nose using a triangular shape. Add small details like nostrils to make it more lifelike.
- For the muzzle, draw a rounded shape underneath the nose. Pay attention to the length and width of the muzzle, as it can vary depending on the breed.
- To draw the paws, start by sketching the basic shapes of the toes and pads. Then, add curves and details to define each individual toe and pad.
- Finally, focus on adding texture and details to the fur. Use short, curved strokes to mimic the appearance of fur. Pay attention to the direction of the strokes, as it can vary depending on the fur’s natural flow.
By following these steps, you will enhance the realism of your dog drawing and create a captivating artwork that showcases the dog’s unique features.
Now that you have mastered the art of adding details to your dog drawing, it’s time to move on to the next stage – coloring. Stay tuned for the next section of this tutorial, where you will learn how to bring your dog drawing to life with vibrant colors!
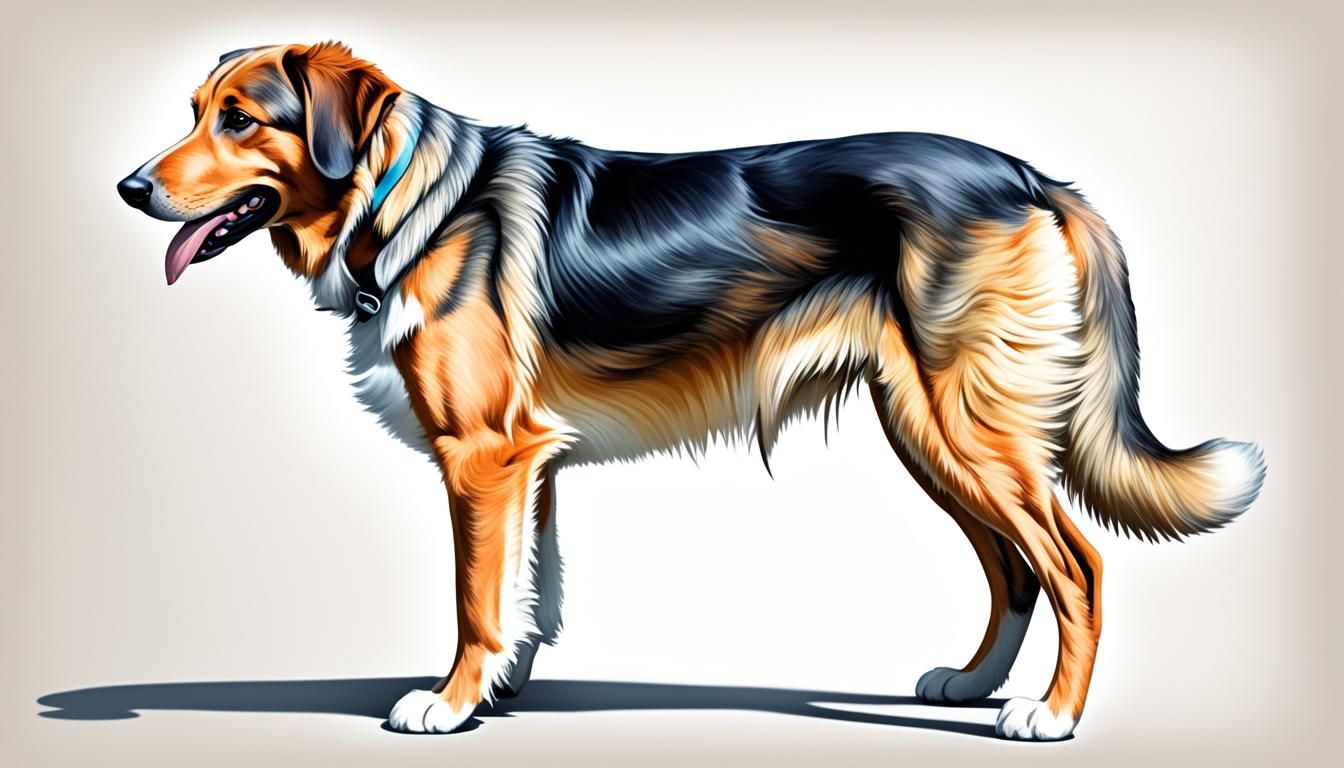
Coloring
Once the dog drawing is complete, it’s time to add color. Using different shades can help create depth and dimension in the drawing, making it more realistic and visually appealing.
The tutorial suggests employing various canine art techniques, such as layering and blending, to achieve the desired effect. While the choice of colors may vary depending on the specific breed or reference image, using different shades of brown for the dog’s coat is generally recommended. This approach helps capture the natural variation in fur color and texture.
Additionally, adding a light pink shade for the tongue can help bring it to life, while a very dark brown shade can be used for the eyes, nose, and shadows, emphasizing their depth and contrast.
The coloring process offers flexibility and allows the artist to adjust and change colors as desired, enabling a creative interpretation while maintaining the overall realism of the drawing.
To enhance the use of color in your dog drawing, consider applying various techniques, such as shading, highlighting, and blending, to create a sense of volume and form. These techniques can further accentuate the three-dimensional qualities of the drawing, bringing the subject to life.
To get inspiration for your own coloring process, take a look at the example below:
| Shades | Usage |
|---|---|
| Light beige-brown | Main coat color |
| Medium brown | Shadows and defining features |
| Dark brown | Eyes, nose, and mouth |
| Light pink | Tongue |
This table showcases the recommended shades and their respective usage in a dog drawing. However, feel free to experiment with different colors and tones to achieve your desired artistic vision.
Conclusion
Drawing a dog can be a delightful and fulfilling artistic pursuit. With the help of this easy guide, anyone, whether a beginner or an experienced artist, can master the art of drawing a dog. By following the detailed step-by-step instructions and honing their skills through the exploration of different poses and techniques, artists can elevate their dog drawing abilities.
By employing the basic forms, outlining the dog’s body and features, and adding realistic details, artists can create captivating and lifelike dog portraits. This tutorial empowers artists to bring their favorite furry friends to life on paper or digital devices, capturing their unique personalities and characteristics.
So, whether you prefer the traditional touch of a pencil or the convenience of a digital device, grab your preferred tool and embark on the journey of creating stunning dog drawings. With practice and patience, you can develop your proficiency and create dog illustrations that captivate and delight. Start drawing your furry companion today, and unlock the joy of expressing your love for dogs through art.