Roses are often considered the epitome of beauty in the floral world, making them a popular subject for artists of all skill levels. Whether you’re a beginner looking to learn the basics or an experienced artist seeking to refine your technique, this step-by-step guide will show you how to draw a rose. This rose drawing tutorial is perfect for beginners and provides easy-to-follow instructions. By the end of this easy rose drawing guide, you will have a stunning rose illustration. Let’s get started!
Materials Needed to Draw a Rose
Before we begin drawing our rose, let’s gather the necessary materials. All you need is paper, a pencil, and fine-tipped markers for adding finishing touches. If you prefer, you can also use colored pencils or other coloring supplies to add color to your drawing. Pencil marks are ideal for sketching, as they allow for easy erasing if needed. Now that we have our materials ready, let’s move on to the next step.
Recommended Materials:
- Paper
- Pencil
- Fine-tipped markers
- Optional: Colored pencils or other coloring supplies

Now that we have gathered our materials, we are ready to start drawing a beautiful rose. Let’s proceed to the next section for step-by-step instructions.
How to Draw a Rose?
Now let’s begin the step-by-step process of drawing a rose. We will break it down into simple shapes and curved lines to make it easy to follow along.
- Start by drawing an oval shape, which will serve as the base of the rose.
- Then, create a small spiral inside the oval to represent the center of the flower.
- Next, add a heart shape around the spiral to form the petals.
- Continue adding more layers of petals and details to complete the rose. Take your time and follow the instructions carefully.
Don’t worry if your drawing isn’t perfect – the beauty of nature lies in its imperfections.

Continue adding layers of petals and details to create a full and realistic rose. Pay attention to the curves and shapes of each petal, as well as the direction in which they overlap. This will add depth and dimension to your drawing.
Alternatively, you can use shading techniques with your pencil or markers to create a more detailed and realistic look. Experiment with different pencil strokes and shading methods to achieve the desired effect.
Remember to be patient and practice regularly. Drawing a rose, like any skill, requires time and perseverance to master. Enjoy the process and embrace your own artistic style!
Step-by-Step Instructions for Drawing a Rose
| Step | Instructions |
|---|---|
| 1 | Start by drawing an oval shape as the base of the rose. |
| 2 | Create a small spiral inside the oval to represent the center of the flower. |
| 3 | Add a heart shape around the spiral to form the petals. |
| 4 | Add more layers of petals and details to complete the rose. |
Adding Details and Shading
Once you have completed the basic shape of the rose, it’s time to add some details and shading to create a more realistic look. Adding these elements will bring depth and dimension to your drawing, making it visually captivating. To achieve a realistic rose illustration, follow these steps:
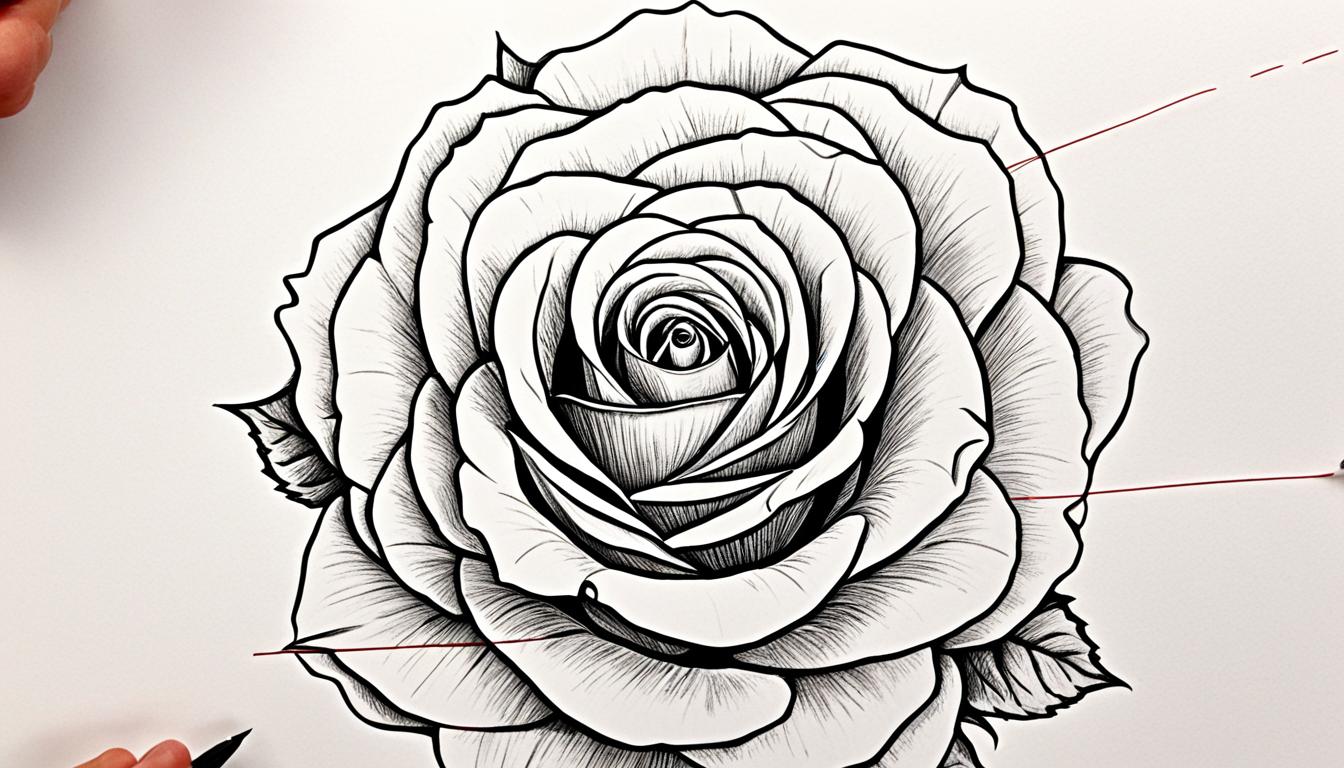
- Draw creases and shadows on the petals by adding curved lines to each petal. This technique will give the petals a three-dimensional appearance, making them look more natural. Remember to vary the length and depth of the lines to create a realistic effect. Take a look at the reference image below:

- Next, add shading to the outer edges of the petals. This will add texture and contrast to your drawing, making it more visually interesting. Use curved lines or crosshatching techniques to create the shading effect. Experiment with different shading techniques to find the style that suits your artistic vision. Here’s an example:
Remember, there is no right or wrong way to draw a rose. Let your creativity shine through and don’t be afraid to experiment with different shading techniques. Practice and patience will help you improve your skills and achieve a truly stunning realistic rose illustration.
Adding the Stem and Leaves
To complete your rose drawing, it is essential to add a stem and leaves. These elements provide stability and contribute to the overall composition of your artwork. Here’s how you can incorporate them:
- Start by drawing a long, slightly curved line for the stem. Ensure that the stem connects firmly to the base of the flower, as this will create a natural flow throughout the drawing.
- Next, depict a leaf using a small triangle shape at the side of the stem. To add more visual interest, include a teardrop shape attached to the triangle. This combination will give your drawing a characteristic leaf structure.
- To make the leaf appear more lifelike, add veins by drawing smaller lines branching out from the center of the leaf. These veins mimic the natural pattern found in real leaves and contribute to a more realistic look.
- Take your time with the details. The stem and leaves are essential components that enhance the overall visual impact of your rose drawing.
Now you’re ready to move on to the next phase of your artwork. Adding a stem and leaves brings your rose drawing to life, allowing it to truly bloom on the paper.

Coloring Your Rose Drawing
Once you have finished your rose drawing, it’s time to bring it to life by adding color. Whether you prefer using colored pencils, markers, or any other coloring supplies, the choice is yours. Color allows you to add vibrant hues and create a visually striking artwork.
For a more traditional look, you can opt for classic colors like red, symbolizing love and passion. However, don’t be afraid to experiment with different shades and tones to give your rose drawing a unique and personal touch.
Now is the time to unleash your creativity and let your imagination run wild. Use your chosen coloring supplies to infuse life into each petal, capturing the essence of the rose’s beauty.
Colored Rose Drawing Inspiration
To inspire you further, here are a few ideas for coloring your rose drawing:
- Create a monochromatic rose by using different shades of a single color. This can add depth and dimension to your artwork.
- Experiment with a gradient effect by blending two or more colors together. Start with one color at the base of the petals and gradually transition to another color towards the tips.
- Add highlights and shadows using lighter and darker shades of the chosen color. This technique can make your rose drawing look more realistic and three-dimensional.
- Consider using complementary colors to create contrast and make your rose drawing stand out. For example, pair red petals with green leaves or yellow accents.
Remember, coloring your rose drawing is an opportunity to express your artistic style and make your artwork unique. So, don’t be afraid to explore and experiment with different coloring techniques. Enjoy the process, and let your creativity bloom!
Additional Drawing Ideas
Once you have mastered the art of drawing a rose, why not explore other drawing ideas to further enhance your artistic skills? By experimenting with various artistic styles and techniques, you can create unique rose designs that showcase your creativity. Additionally, learning to draw other types of flowers can broaden your artistic horizons and allow you to explore different shapes, colors, and textures.
The possibilities are endless when it comes to artistic expression, so do not be afraid to push your boundaries and try new things. Remember, practice makes perfect, and with dedication and time, you can develop into a skilled artist. Let your imagination guide you and allow your passion for art to shine through in your drawings.
Artistic Rose Design Tutorial
If you are looking for inspiration or guidance in creating artistic rose designs, there are various tutorials available online. These tutorials provide step-by-step instructions, allowing you to follow along and learn new techniques. Whether you prefer a realistic or abstract approach, these tutorials can help you develop your artistic style and create stunning rose illustrations.
One popular artistic rose design tutorial is provided by Art for Kids Hub. This tutorial breaks down the drawing process into simple, easy-to-follow steps, making it suitable for artists of all skill levels. The tutorial covers topics such as shape construction, shading techniques, and adding details to bring your rose design to life.
Another valuable resource is the Proko YouTube channel, which offers a comprehensive guide on how to draw roses. This tutorial includes in-depth explanations of rose anatomy, tips for capturing the unique characteristics of a rose, and techniques for achieving realistic shading and texture. The step-by-step demonstration allows you to follow along and practice your skills at your own pace.
Remember, each artist has their own unique approach to drawing roses, so feel free to adapt and personalize the techniques you learn in these tutorials to suit your style and preferences.
Conclusion
Drawing a rose is a rewarding and enjoyable artistic endeavour. With the help of this step-by-step guide, even beginners can create beautiful rose illustrations. By following the simple shapes and curved lines, you can bring a stunning rose to life on paper.
Remember, drawing is not about perfection. Embrace your own artistic style and let your creativity shine through. The unique qualities of your drawing are what make it special and personal to you.
So, grab your paper, pencil, and markers, and start drawing your own stunning rose today. Whether you’re using traditional colours or experimenting with different shades, have fun with the process and let your imagination run wild. Happy drawing!
FAQs
Can I color my rose drawing?
Yes, you can use colored pencils, markers, or any other coloring supplies of your choice to add vibrant hues to your artwork. Experiment with different shades to create your desired look.
What other drawing ideas can I explore after drawing a rose?
You can try experimenting with different artistic styles and techniques to create unique rose designs. You can also learn how to draw other flowers and expand your artistic skills.
Is it necessary to follow the steps exactly?
No, there is no right or wrong way to draw a rose. Feel free to add your own personal touch and let your creativity shine through.
How long does it take to become a skilled artist?
Becoming a skilled artist takes time and dedication. With practice and perseverance, anyone can improve their drawing skills and create beautiful artwork.