Welcome to our comprehensive guide on how to lay turf, also known as grass laying or turfing a lawn. If you’re looking to transform your outdoor space into a lush and vibrant garden, proper turf installation is key. Whether you’re starting from scratch or renovating an existing lawn, this guide will provide you with the step-by-step instructions, tips, and considerations for achieving a perfectly laid turf.
In this guide, we will cover the essential tools and products required for laying turf, the importance of preparing a suitable base for a long-lasting installation, and the steps to remove existing turf and prepare the sub-base. Additionally, we will provide tips for leveling the area and installing a second layer of weed membrane, ensuring a flawless turfing process.
Whether you’re a beginner or have some experience in garden projects, our detailed guide will assist you in achieving professional-like results. Follow our step-by-step instructions and learn how to lay turf perfectly, saving both time and money.
How to Lay Turf Perfectly?
If you’re looking to transform your outdoor space into a lush green lawn, laying turf is an excellent choice. By following these step-by-step instructions, you’ll be able to create a beautiful turf lawn that will bring joy and relaxation to your home. Here’s how to lay turf lawn step by step:
Step 1: Remove existing turf to the desired depth
The first step in laying turf is to remove any existing turf or vegetation from the area where you want to lay the new lawn. Use a turf cutter or a spade to cut and remove the old turf to a depth of around 5cm.
Step 2: Clear the area and install a suitable perimeter edging
After removing the old turf, clear the area of any debris and level the surface. Install a suitable perimeter edging using wooden stakes or metal strips to define the boundaries of your lawn.
Step 3: Lay the first layer of geotextile weed membrane and fill the area with Type 1 aggregate
To prevent weeds from growing through your new turf, lay a geotextile weed membrane over the prepared area. Ensure it covers the entire surface and overlap the edges by at least 10cm. Next, fill the area with Type 1 aggregate, a granular material that provides a stable base for your turf.
Step 4: Level and compact the base materials
Use a rake or a shovel to level the aggregate and create a smooth surface. Ensure the base is firm and compact by using a roller or plate compactor. This will provide a stable foundation for your turf.
Step 5: Install the second layer of weed membrane and secure it to the edging
Once the base is prepared, lay a second layer of geotextile weed membrane over the compacted aggregate. Ensure the membrane extends beyond the edges and secure it to the perimeter edging using landscaping staples or fixing pegs.
| Step | Task |
|---|---|
| 1 | Remove existing turf to the desired depth |
| 2 | Clear the area and install a suitable perimeter edging |
| 3 | Lay the first layer of geotextile weed membrane and fill the area with Type 1 aggregate |
| 4 | Level and compact the base materials |
| 5 | Install the second layer of weed membrane and secure it to the edging |
Installing the Artificial Grass
Once you’ve prepared the base for your turf installation, it’s time to lay the artificial grass. Follow these steps to ensure a successful installation:
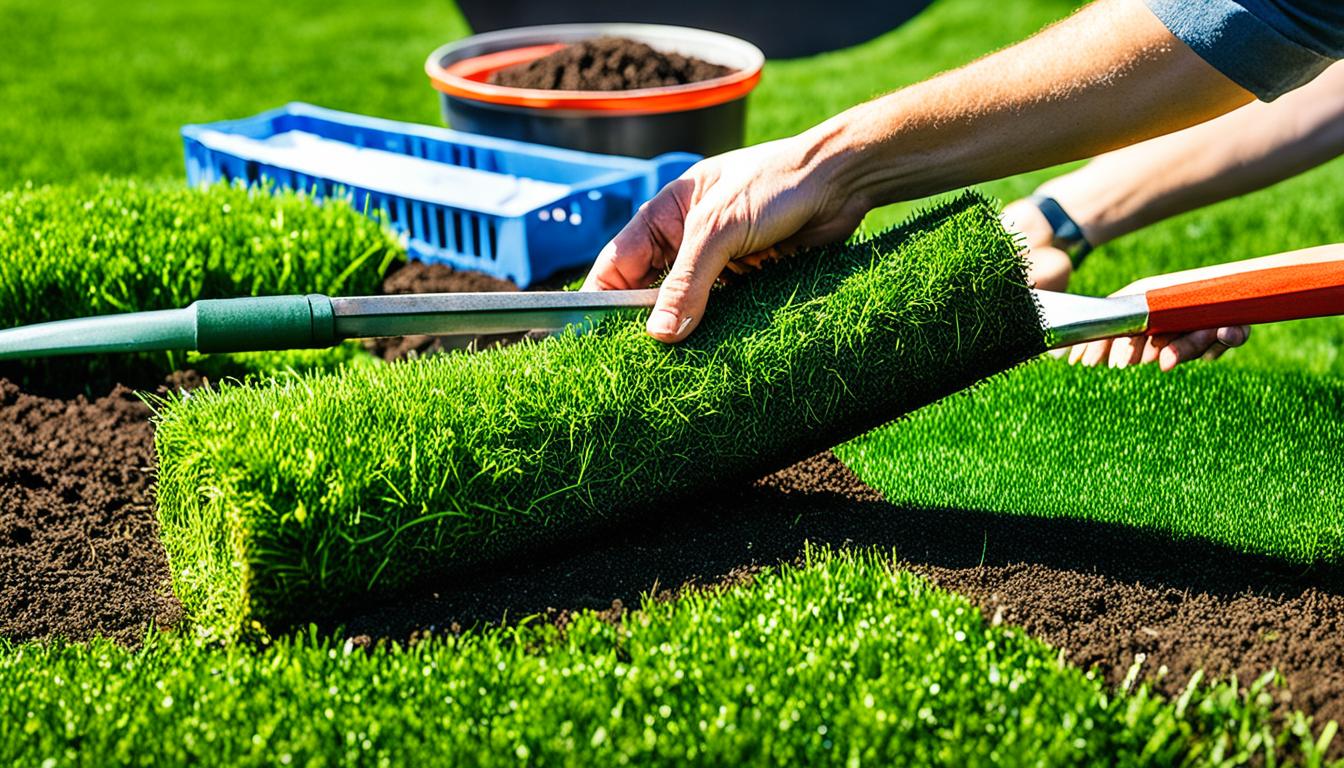
Step 6: Lay the artificial grass and allow it to settle flat.
Start by unrolling the artificial grass onto the prepared base. Position it carefully, ensuring that it sits flat and doesn’t have any folds or ripples. Allow the grass to settle for a couple of hours before moving on to the next step.
Step 7: Join rolls of artificial grass if necessary.
If your artificial grass comes in multiple rolls, you’ll need to join them together to create a seamless surface. Follow the manufacturer’s instructions for joining the rolls, using adhesive tape or glue specifically designed for artificial grass installations. Make sure the joins are smooth and secure.
Step 8: Trim the edges and secure the grass to the perimeter.
Using a sharp utility knife, carefully trim any excess grass along the edges to achieve a clean and neat finish. Once trimmed, secure the edges of the artificial grass to the perimeter using galvanized nails or landscape staples. Space the nails or staples about 6 to 8 inches apart, ensuring they penetrate the base materials.
Step 9: Lift the pile for a neat finish.
To enhance the appearance of your artificial grass, use a stiff broom or brush to lift the pile. This step helps to separate the individual blades of grass and create a more natural and aesthetically pleasing look. Brush against the grain of the grass for the best results.
Step 10: Review the installation and allow the grass to acclimate before use.
Take a final look at your artificial grass installation to ensure that everything is in place and visually appealing. Make any necessary adjustments or improvements before the grass is fully settled. Allow the grass to acclimate to its new environment for at least 24 hours before using it for regular activities.
By following these steps, you’ll be able to install artificial grass over your existing lawn, creating a durable and low-maintenance alternative. The finished result will provide you with a lush and green outdoor space that you can enjoy all year round.

Tips and Considerations for Turf Installation
When it comes to laying turf, proper preparation is key to achieving a beautiful and long-lasting lawn. Here are some essential tips and considerations to keep in mind:
Leveling the Soil Before Laying Turf
Before laying turf, it’s important to ensure that the soil is level and free from any bumps, lumps, or debris. Use a garden rake or a garden leveling tool to even out the surface and create a smooth base for the turf.
Preparing the Area
Prior to turf installation, preparation is crucial. Remove any existing vegetation, such as old grass or weeds, by using a turf cutter or manually digging it out. This will provide a clean slate for the new turf to take root.
Choosing the Right Type of Turf
Selecting the correct type of turf is essential for achieving the desired result. Consider factors such as the amount of sunlight the area receives, the level of foot traffic it will endure, and the soil type. For example, if you’re laying turf on clay soil, choose a variety that is tolerant of such conditions.
Laying Turf on a Slope
If you have a sloping area where you plan to lay turf, it’s important to take extra precautions. Install wooden or metal edging to prevent erosion, and secure the turf rolls with stakes to ensure they stay in place. Additionally, consider using erosion control blankets to further stabilize the soil.
Laying Turf on Clay Soil or Topsoil
When laying turf on clay soil, it’s important to take steps to improve drainage. Add organic matter, such as compost or well-rotted manure, to the soil to improve its structure and drainage capabilities. Alternatively, you can opt for using a layer of topsoil specifically designed for turf installation.
Removing Old Grass and Laying New Turf
If you need to replace existing grass with new turf, follow these steps. First, remove the old grass, ensuring that all roots and debris are cleared away. Then, prepare the soil as mentioned earlier and proceed with laying the new turf on the well-prepared surface.

Incorporating these tips and considerations into your turf installation process will help create a solid foundation for a thriving and beautiful lawn. With proper preparation and careful attention to detail, you can enjoy the lushness and vibrancy of a well-laid turf for years to come.
Conclusion
In conclusion, turfing a lawn requires careful consideration and proper installation techniques to ensure a successful outcome. By following the step-by-step guide for laying turf and considering important factors such as soil preparation and choosing the right type of turf, you can achieve a beautiful and long-lasting lawn.
Proper preparation is crucial for creating a suitable base for the turf installation. Removing existing turf, leveling the area, and installing a weed membrane are essential steps to ensure a smooth and weed-free lawn.
By installing the turf correctly, with attention to detail and precision, you can enjoy the satisfaction of completing a turfing project on your own. Not only will you have a stunning lawn, but you will also save money by avoiding the costs of hiring professionals.
To summarize, turfing a lawn requires patience, proper preparation, and installation techniques. By following the recommended steps and considering the necessary factors, such as soil leveling and choosing suitable turf, you can achieve a beautiful and healthy lawn that will enhance the aesthetic appeal of your outdoor space.